Add Graded Activities to the LMS
In a previous chapter, you learned how to configure a chapter as a graded activity in Pressbooks and how to obtain a launch URL to be used within the Learning Management System. Here we will show you how to add a configured Pressbooks chapter as a graded activity to a course within your Learning Management System.
If you are a network manager, the first thing you may want to do is to decide which version of Common Cartridge exports book administrators on your network should be able to produce. On the network-level LTI 1.3 Settings page you will also an option called Allow books to override role-mapping and Common Cartridge defaults.
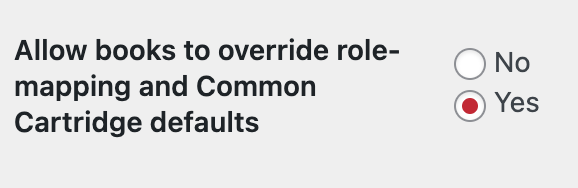
If marked ‘Yes’, this will allow individual book administrators to decide which Common Cartridge file they can export on a book-by-book basis. If marked ‘No’, you as the network manager can decide which exports will be available for book admins; if set to no, your choices will function as a global setting. You can set your network defaults via the Common Cartridge -> Create export files designed for use with: setting at the bottom of the settings page:
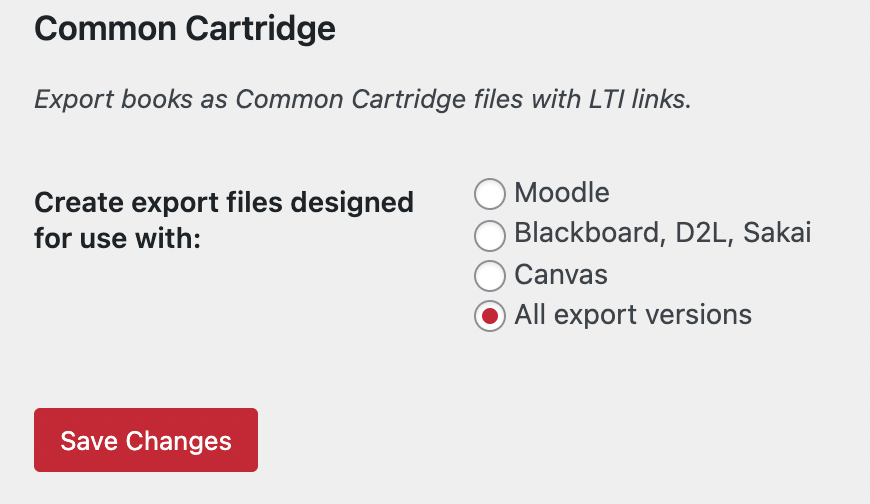
Your goal should be to ensure that book administrators have the ability to produce Common Cartridge export files designed for use with the LMS they’re planning to launch their books in.
Canvas
In Canvas, you can import several chapters of your book at once using using a Common Cartridge with LTI Links (Canvas) file or each chapter manually using the LTI 1.3 Launch Link.
Importing using Common Cartridge File
If you wish to have all (or many) of the parts and chapters of your book imported into your Canvas course as external tool links or graded assignments, you can do this quickly and easily by exporting a Thin Common Cartridge file in Pressbooks and importing this file into your Canvas course.
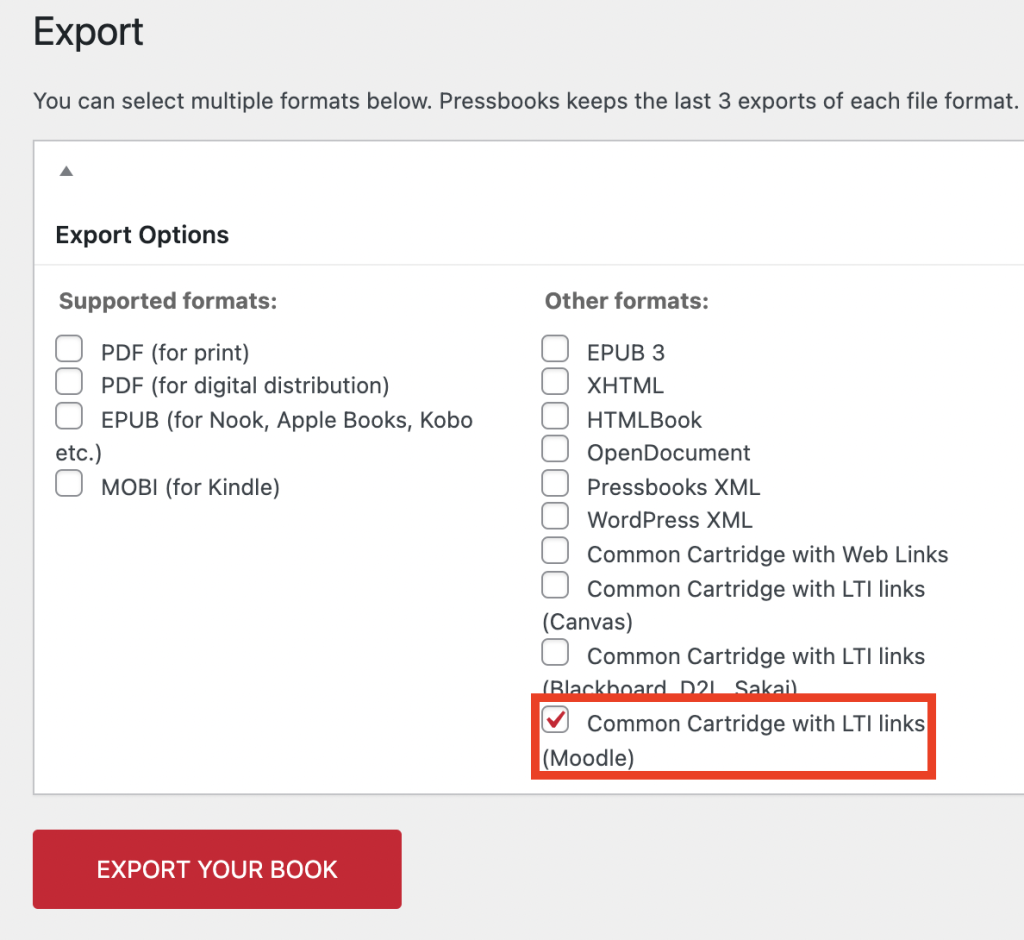
To produce a Thin Common Cartridge file, visit the Export menu available in the Pressbooks book dashboard. Select the Common Cartridge with LTI Links (Canvas) option and select Export Your Book.

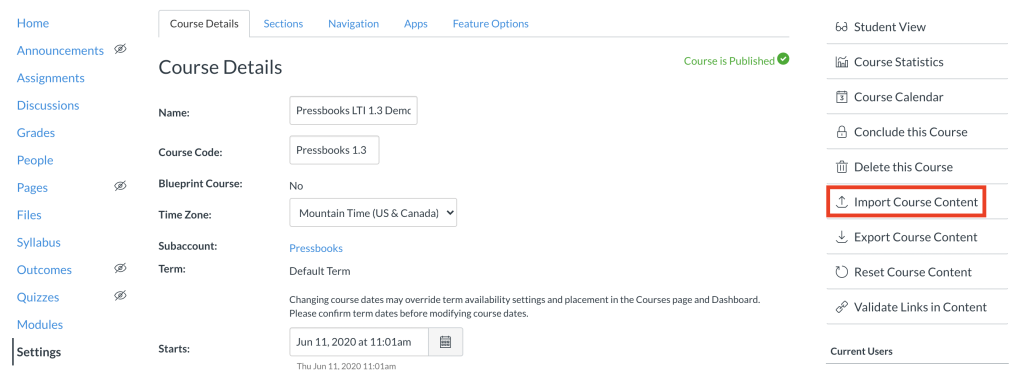
Once this file has been produced, download this file to your computer and navigate the Canvas course you’d like to import your activities into. In your course on Canvas, select Settings on the left-hand navigation bar. On the Settings page, select Import Course Content.
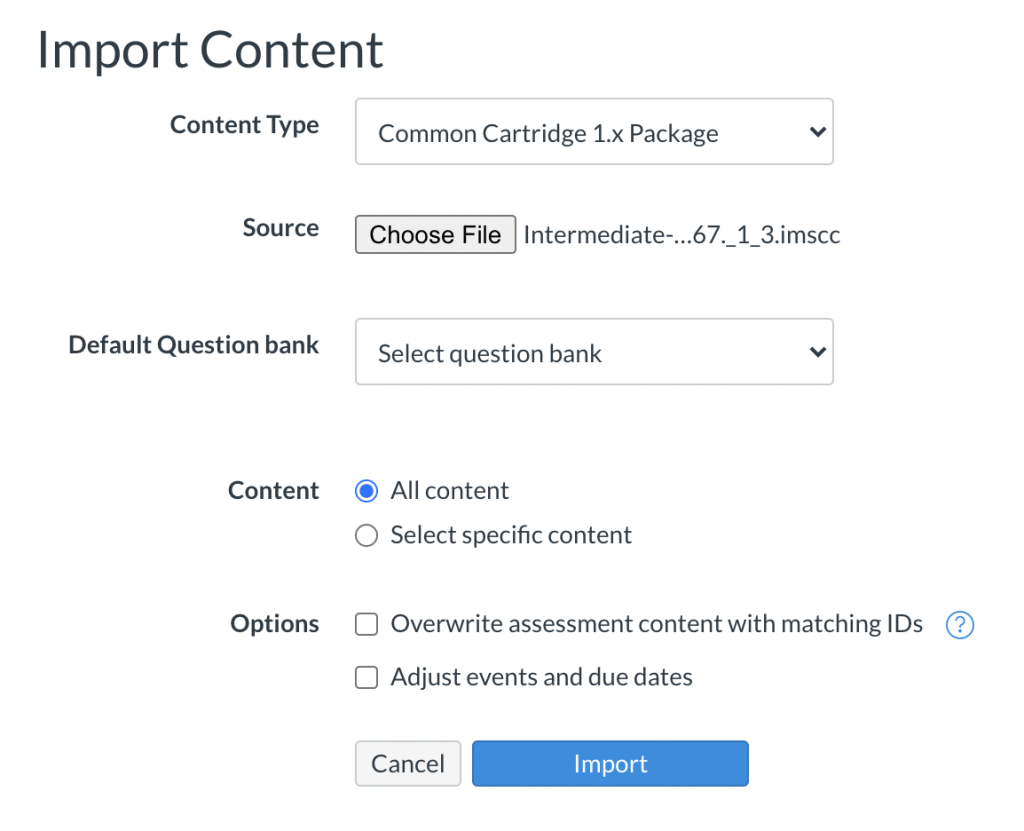
On the Import Content page, do the following:
- Select your Content Type as Common Cartridge 1.x Package
- Upload your Common Cartridge with LTI Links (Canvas) file (.imscc) in the Source field
- For content, select All Content
Then, click on Import to finalize the import.
Thereafter, you will see your file, along with the time of import and status of the import. When the status shows Completed on the right hand-side, it means that the file has successfully been imported.

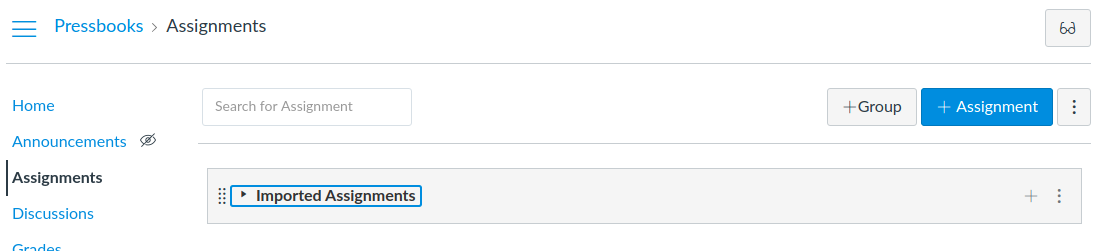
Now, you can enter your Modules from the left hand-side navigation bar (above Settings) in your course to see your imported content. Any chapters which you specified as ‘Assignments’ when configuring the chapter for grading should have been imported as graded assignments. You can now configure these as you would any other external tool assignment in your course.
Importing individual chapters using Launch Link
You can also create graded assignments manually, using the chapter’s launch URL.
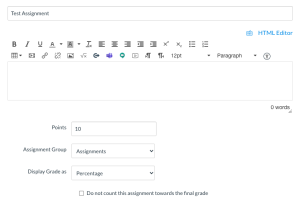
To do this, navigate to the Assignments menu of your Canvas course and select the +Assignment button.
You will then view a configuration page which will allow you to edit the assignment to your liking. Configure this assignment as desired, including a name, description, point value, assignment group and grade display options.
For Submission Type choose External Tool and click the Find button.
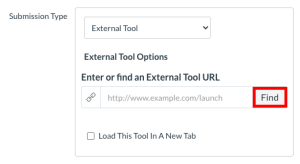
In the window, select the correct LTI tool, and paste the Launch URL for your graded activity from Pressbooks into the URL field. When complete, click Select.
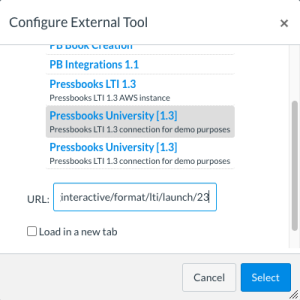
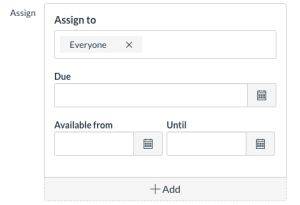
Once selected, this window will close. At this point, you can move on to the next box, Assign, where you can decide who to assign the assignment to, as well as the dates that this assignment will be displayed. When setting availability dates, be advised that these dates simply control when the assignment will be available in your Canvas course. The dates for which grades will be recorded are the dates which were selected when configuring your chapter for grading within Pressbooks.
Press Save once you are happy with the details of the assignment, and your assignment should launch. Now, it is ready to be published, added to course modules, and assigned to or completed by course participants.
Moodle
Importing Common Cartridge File
In Moodle, you can connect your entire book (rather than chapter-by-chapter) to be graded by importing the Common Cartridge with LTI Links (Moodle) file.
This file can be exported from the Export page found on the left-hand navigation bar.
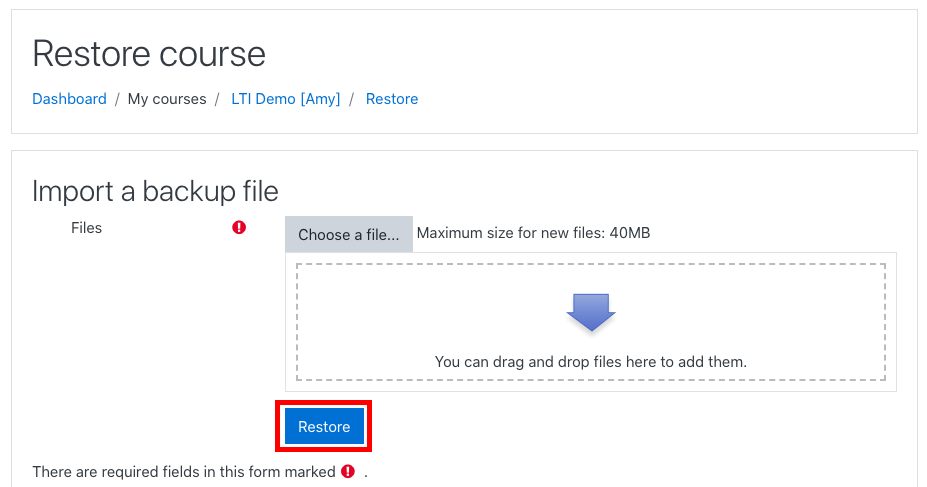
Then, in Moodle, go to your course. Under the settings cog on the top right-hand side, select Restore.

On this page, you can now import the Common Cartridge with LTI Links (Moodle) exported from Pressbooks and click Restore.
Once you do this, you will be taken through a short, seven-step process in order to enable this book and grade reporting on Moodle.
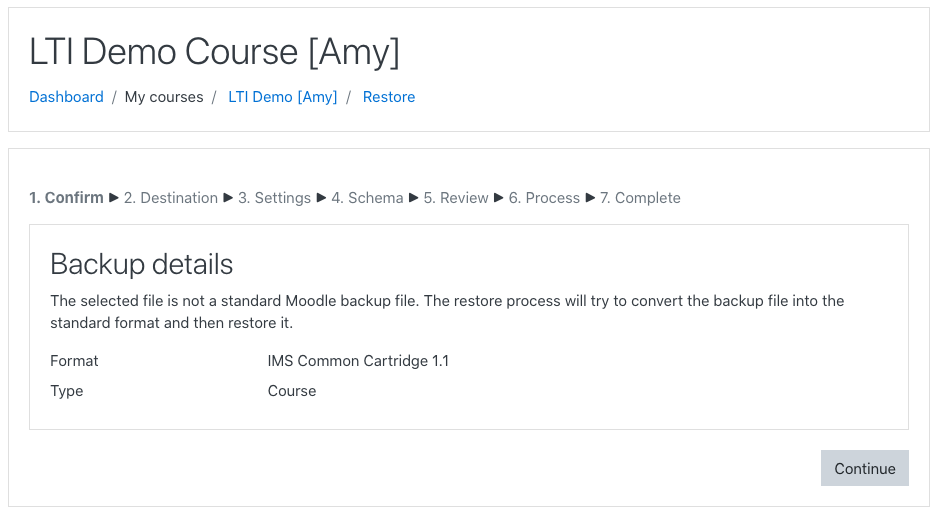
In each step, you will be offered the default selections, which you can customize as you go along. At the last step, once you click Perform Restore, you will get a success message.

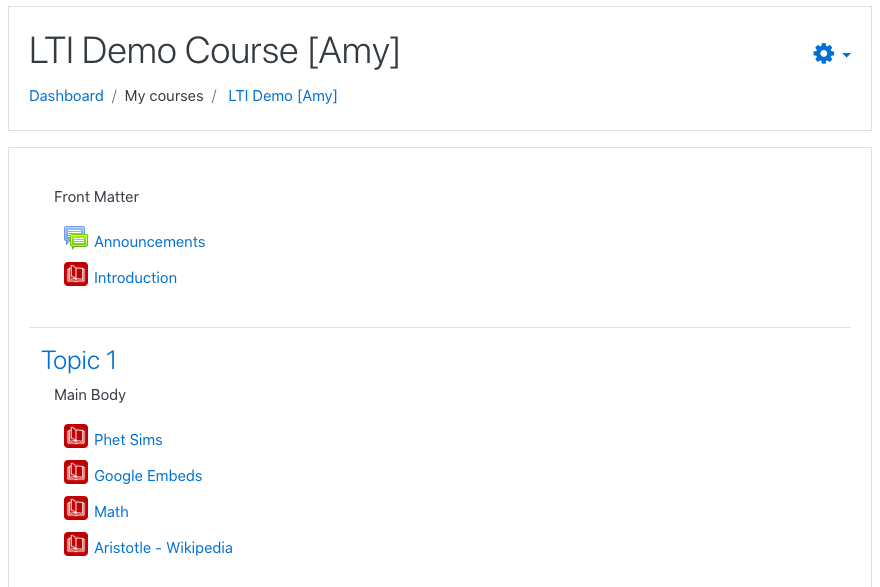
Click Continue, and you will be taken to your newly restored course. You will now see links to each of the book chapters imported into your course.
Finalizing LTI connection for Grade Reporting
Although you have imported links to each of these activities, in order for grade reporting to work, Moodle currently requires you to manually save the settings for each of the LTI links that have just been created.
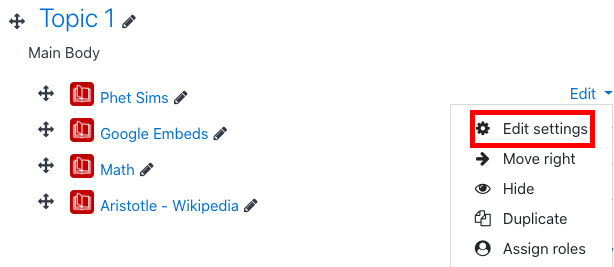
To do so, begin by selecting the Turn Editing On option for your course.

This will show the edit setting for all chapters.

For each of the LTI links you’ve just created, you need to click Edit and then Edit settings.
Opening the edit settings menu for one of these LTI links should cause Moodle to use its automatic tool configuration logic to recognize your already configured Pressbooks LTI 1.3 tool. You can confirm that the connection has been established by looking for a green check mark and a success message beneath the activity’s Tool URL field.
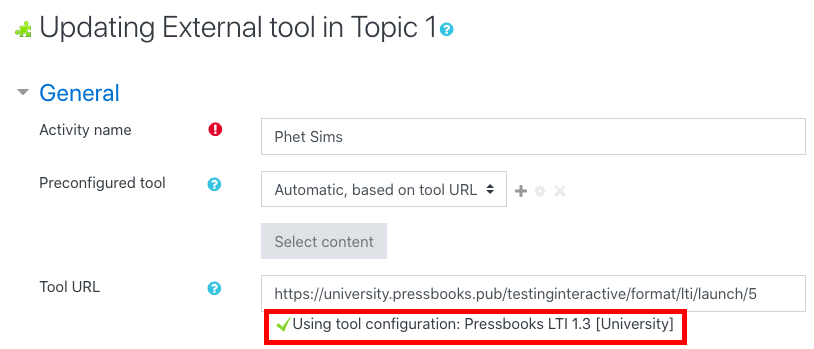
Once you see this check mark, click Save and return to course or Save and display. After you’ve verified this connection, your activity is ready to be used by users!

Conversely, if you do not wish to have certain chapters graded, you can unpublish or delete the links from within the LMS.
D2L/Brightspace
In D2L/Brightspace you can bring in individual grade chapters using the launch URL as created using LTI 1.3 in your Pressbook chapter.
-
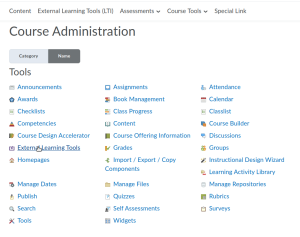
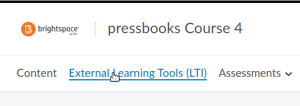
- After logging into your D2L course as an admin/faculty user, click Course Tools > Course Admin > External Learning Tools
External Learning Tools link as seen in the Course Admin menu in D2L In some instances, External Learning Tools (LTI) may also be available in the course navigation menu:
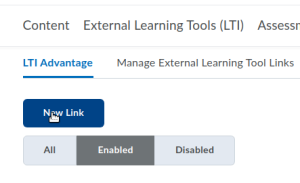
External Learning Tools link seen in the nav menu of a D2L course - From the External Learning Tool menu, click the LTI Advantage tab and select New Link
- After logging into your D2L course as an admin/faculty user, click Course Tools > Course Admin > External Learning Tools
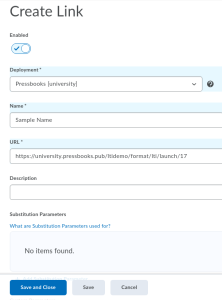
- Configure the Create Link menu. Make sure the Enabled toggle is ‘on’, select the appropriate deployment (the name of your Pressbooks network as configured by your LMS administrator), give the link/activity a name, and paste the launch URL you copied from the Pressbooks editing interface. Once you’ve entered all the information as desired, select Save and Close.
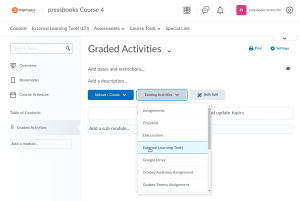
D2L’s create link menu for LTI Advantage links filled out with sample values - Now that you have created an LTI Advantage link for your graded Pressbooks chapter, you can add it to your course content. Go into Content on the top bar and either create or select an existing module. From the chosen module’s content builder tool, select Existing Activities > External Learning Tools.
Adding an existing activity (external learning tool) from within D2L’s content builder tool - A popup will appear displaying a list of available LTI links for your course. Select the LTI link you just created previously:

Adding an LTI link as an existing activity within D2L This will add your LTI link into this module, and you will now see it as an listed activity in the module interface.
- Launch the new link and scroll down to the Activity Details section at bottom of the embedded activity. On the right hand side of the page, you will see an Assessment menu with the option Add a grade item. When you select this option you will be able to associate this activity with an existing gradebook entry or create a New Grade Item.
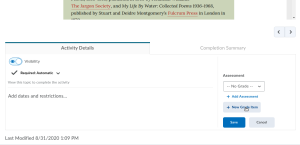
Create a new grade item for an external tool launch from the Activity Details section in D2L If you do not see the ‘add a grade item’ option, it means that this module is using the D2L feature Content Experience, which Pressbooks grading is not compatible with. To turn Content Experience off, go back to your module page. On the top right hand side of the module page, click the button with an arrow; this is the Content Experience selector. Then, click Turn It Off. Now, when you launch the link again, the grading option will be available.
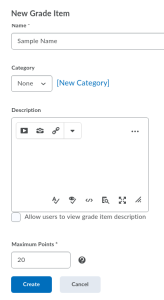
- If you select New Grade Item, a popup will appear which will allow you to create a ‘New Grade Item’ for this activity. Give the grade item a name (this is how it will appear in D2L’s gradebook for instructors and students) and maximum point value. You can also assign it to a category in the gradebook if desired. Once you have configured the grade item to your liking, press Create.
- Upon creation of a new grade item, you will see a success message: ‘Grade item created successfully’. You should also see the name of the new grade item selected in the dropdown menu just above + Add Assessment.
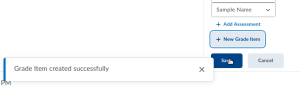
Once you see the ‘Grade item created successfully’ message, click the ‘Save’ button to associate the activity with the new grade item. Click Save to associate this activity with the newly created grade assignment. You will see a success message: ‘Grade item assigned successfully.’ This means the activity is now configured and ready to send grades to your D2L gradebook!

This ‘Grade item assigned successfully’ message will appear when you’ve successfully associated your LTI Advantage activity with a grade item in D2L


Blackboard
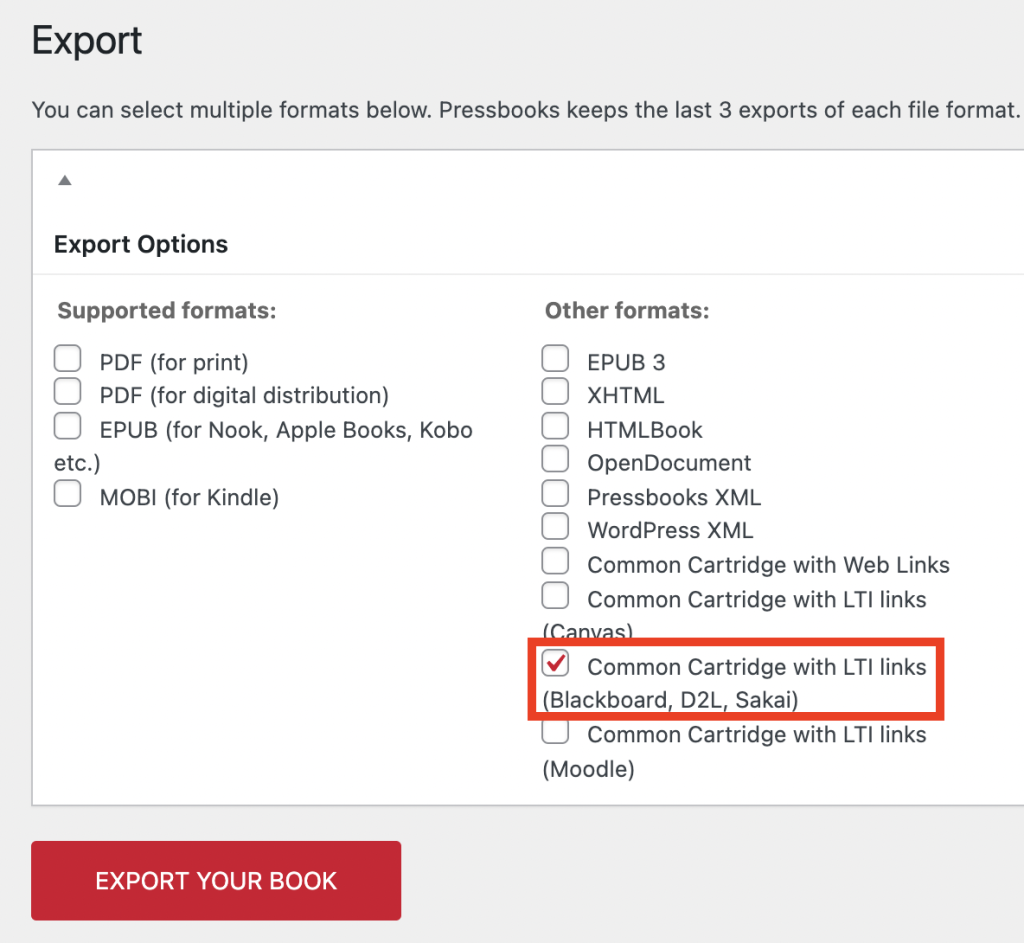
In Blackboard, you can choose to import the whole book using a file called Common Cartridge with LTI links (Blackboard, D2L, Sakai) or bring in individual graded chapters using the LTI 1.3 Launch Link.
Importing Common Cartridge File
If you wish to have an entire book and all of the H5P activities in it enabled for grade reporting, you can connect your entire book by importing the Common Cartridge with LTI links (Blackboard, D2L, Sakai). file.
This file can be exported from the Export page found on the left-hand navigation bar.
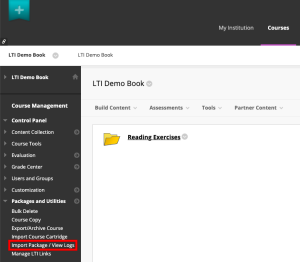
Once you’ve produced and downloaded this Common Cartridge (.imscc) file, you can now import the package to Blackboard. Enter your course on Blackboard. Under Course Management on the left-hand side, select Import Package / View Logs.
This will take you to the selected page, where you will see a button called Import Package.

When you navigate to the import page, you can upload your file under Select a Package. Thereafter, you will see the file that you’ve uploaded underneath.

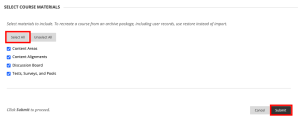
If you keep scrolling, you will see that you will have options to decide the parts of the book you can import. Selecting all is the most comprehensive way to bring in all necessary parts of your book. Click Submit to upload this file.
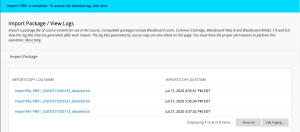
You will land on the Import Package / View Logs page again, where you will see the progress and success messages at the top. Once you see the blue success message, your course has been uploaded in full. Furthermore, you will be able to see the course which has been successfully uploaded in the Import/Copy Log Name list.
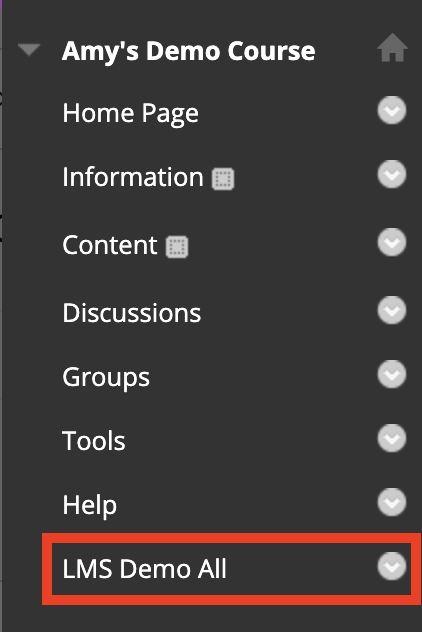
Once successfully imported, you’ll need to finish the configuration. On the course menu bar on the left hand side, see the imported file as the last selection; select this button.
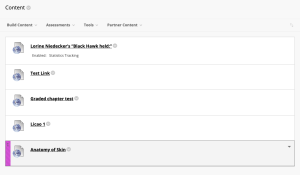
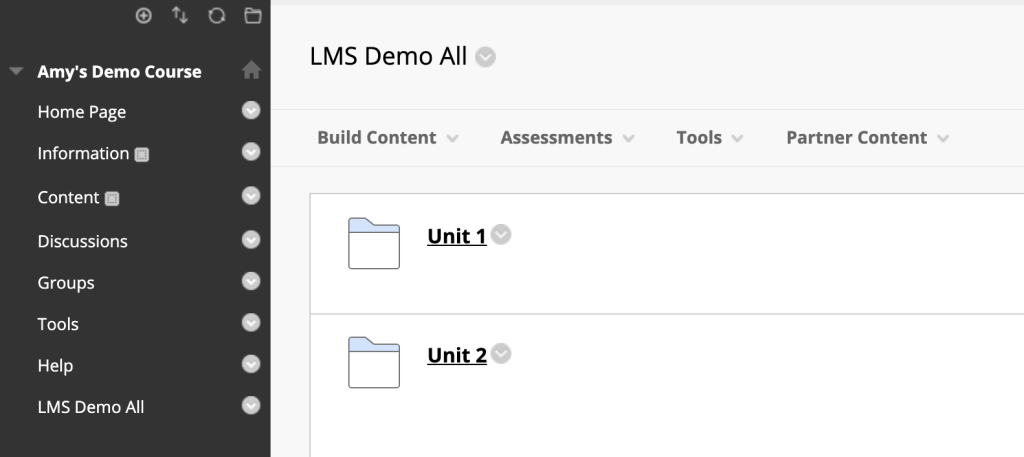
You’ll be lead to the book’s content, and you’ll see that this interface shows the Parts of the book. Click on the Part to see the Chapters within it.
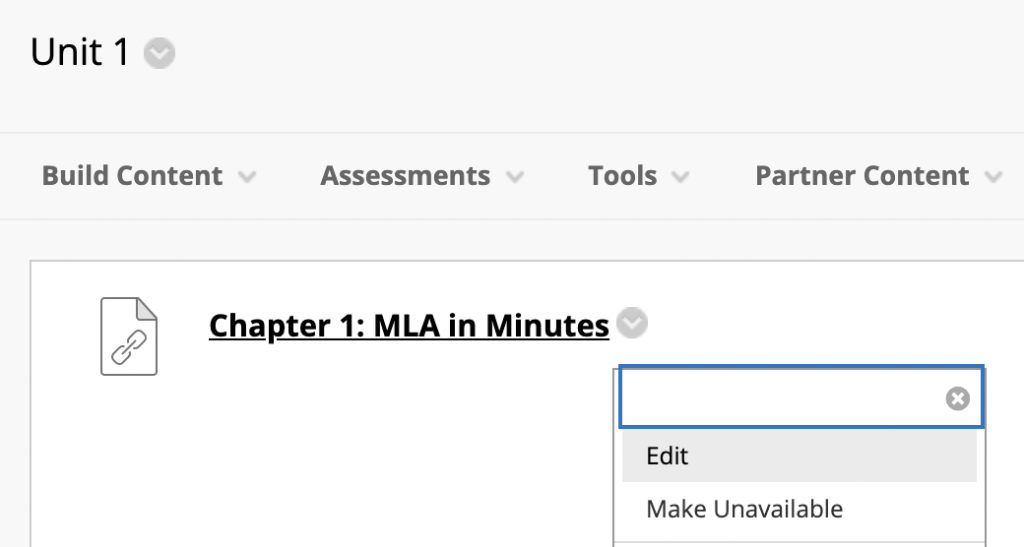
For each chapter that has been configured for grading, select the upside down arrow button next to the title, and select Edit.
From here, make sure to set points and dates as necessary for your grading scheme. Once you’re happy, click Submit, and your chapter should be ready for use.
Importing Launch Link
In Blackboard, you can import individual chapters to be graded by using your launch URL as created using LTI 1.3 in your Pressbook chapter.
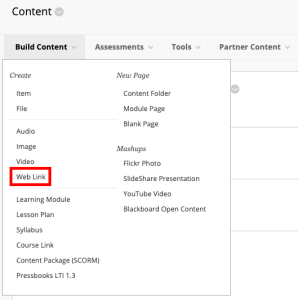
When you enter your course on Blackboard, on the left hand side, you can select Content.

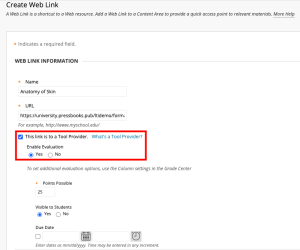
In Content, under Build Content, you will have multiple options to add files of your liking. To import the LTI 1.3 Launch link, select Web Link.
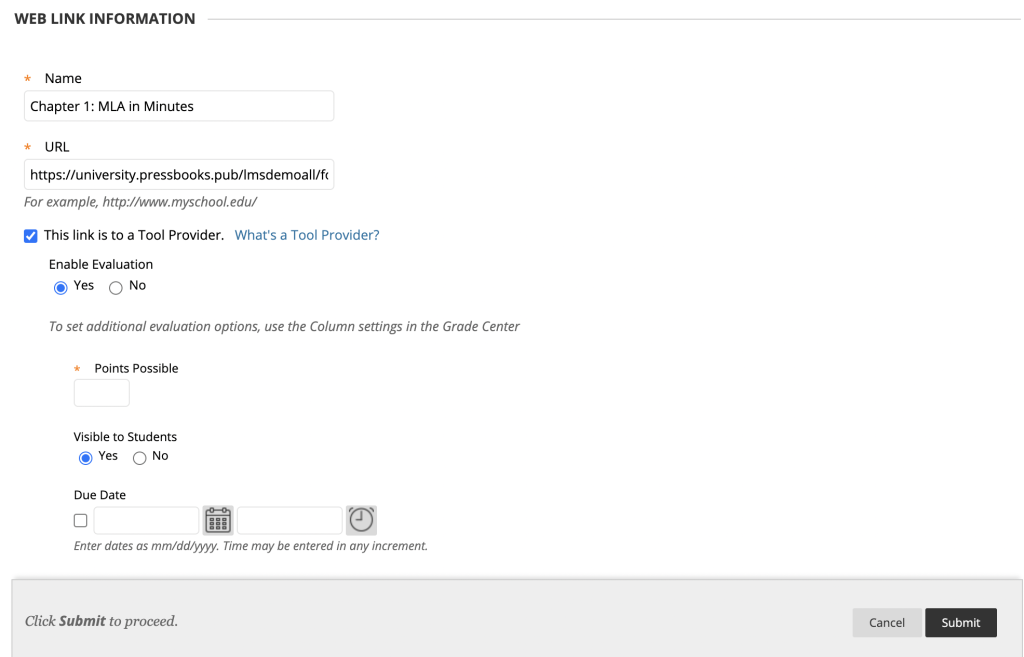
Now, you will have the option to add Web Link Information as seen fit. The fields with an asterisk must be filled. After putting in a name for this chapter, you can now fill the URL field with the Launch URL acquired from your Pressbooks chapter.
As this is an external tool, you must select Yes after selecting the box for This book is a Tool Provider. Then, select the points possible.
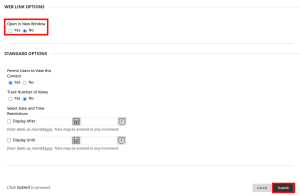
By selecting No for Open in a New Window, your graded chapter will open within the same browser. After choosing other settings which suit you, you can Submit this chapter import.
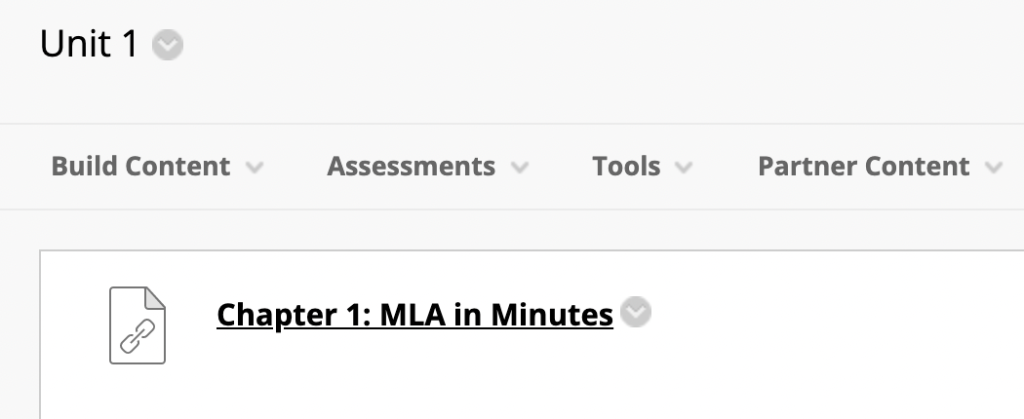
You should now see your chapter in your Content for this course.