Adjust Network Settings
As a network manager of a Pressbooks network, you can change several network configuration options to suit the needs of your institution or publishing program. To access your Network Options, click Settings from your Administer Network dashboard.
View Current Network Managers
This section displays a list of user names and email addresses for your current network managers and instructions for requesting a change to this list.
View LTI 1.3 connection usage
This section displays the number of students who have used the grade passback feature included in our optional Results for LMS product add-on and provides instructions for purchasing more student connections for your network, if desired.

Enforce Book Upload Space Quota
This setting allows you to enforce a per-book storage quota for books on your network. By default this setting is not activated on your Pressbooks network. To enforce a size quota for individual books:
- Click the check box in front of the ‘Limit total size of files uploaded to’ prompt
- Enter the per book quota size you’d like to impose (numerical values in megabytes or MB)
- Click Save Changes.
Set Max upload file size
By default, all Pressbooks networks impose a maximum file size upload limit of 25000 kB (25 MB). However, you can reduce this limit on your network if you wish. To do so enter your desired maximum file upload size in this field, expressed as kB (1000 kB = 1 MB) and click Save Changes.
Set Default Book Theme
While book administrators can select whatever theme they’d like to use for their books, each new book created on your network will have have your network’s default book theme applied when it is created.
Pressbooks networks generally use Malala as their default theme. As a network manager, you can choose to designate another book theme as the default book theme for your network. To change your network’s default book theme, select your desired theme from this drop-down menu and click Save Changes.
Set Default Language
Each book is created with a default language at the type of its creation. This value can later be changed by book administrators. To change the default language for new books created on your network, select your preferred option from the drop down menu and click Save Changes.
Set Default PDF Page Size
At the time of creation, books also have a default PDF page size. This refers to the size of the page used when generating PDF exports, and can be changed by book administrators in their theme options. By default, the value is set to ‘Digest (5.5″ x 8.5″)’ for all Pressbooks networks.
If you would prefer for books to have a different default PDF page size value, you can change this value by selecting your preferred page size (or choosing custom and entering your desired values using CSS-compatible units like in or em) and clicking Save Changes.
Update Iframe Allowlist
An iframe is an HTML element which allows users to display an HTML document (i.e. an external webpage) from one source inside of another HTML document (i.e. your webbook). Because the use of iframes involve embedding content from external sites into Pressbooks, we prevent the embedding iframes from non-trusted sources into their books by default. However, Network Managers can manually allowlist trusted domains or paths. Once you have saved changes to your iframe allowlist, any iframe whose src attribute matches a domain or path on your allowlist can be added to a book by any author on your network.
To add a domain or path to your network iframe allowlist, paste the desired domain or path into the Iframe Allowlist field on its own line and click ‘Save Changes‘. Guidelines for the expected input format are included below the input field.
An allowlisted domain or path must match the iframe src URL exactly in order for the iframe to properly embed and display. Please note that content cloned from other networks may include iframes from sources which have not been allowlisted on your network. If this is the case, these iframes will not display in the cloned book.

Note: Pressbooks is compatible with any media that supports oEmbed. In addition, some media sources have been vetted and added to our global Pressbooks allowlist. Iframes from globally allowed sources can be embedded on any Pressbooks network by any user. This allowlist includes:
Learn more about embedded media options in Pressbooks.
Opt Out of Pressbooks Directory
If this option is not selected (the default setting), all public books in your Pressbooks network will be included in the Pressbooks Directory, unless a book admin chooses to opt-out of inclusion in the Directory. If this option is selected, only those books which network managers have chosen to display in a network’s catalog will be flagged for inclusion in the Pressbooks Directory and individual book admins will not see any book-level opt-in options. This selection is not permanent and can be switched at any time.
The settings page features a second tab titled ‘Book & User Registration’. The options presented on this tab are explained below:
Allow registered users to create and clone new books
As a network manager, you can decide whether or not users on your network have the permission to create or clone new books on the network. This box is checked by default on Pressbooks networks, which means that registered users can create new books and clone books onto your network. If this box is unchecked, only network managers will be able to create new books and clone books on your network. You would then be able to add or invite registered users to books that you have already created or provisioned for them.
Allow user self-registration
As a network manager, you can decide whether or not visitors to your network can self-register for user accounts on your network. This box is unselected by default on Pressbooks networks, which means that new user accounts can only be created by invitation.
If you’d like to enable user self-registration for your network, you can do so by checking this box, and clicking Save Changes. If checked, non-logged in visitors will see a Sign Up link next to Sign In when visiting the network home page (shown below).
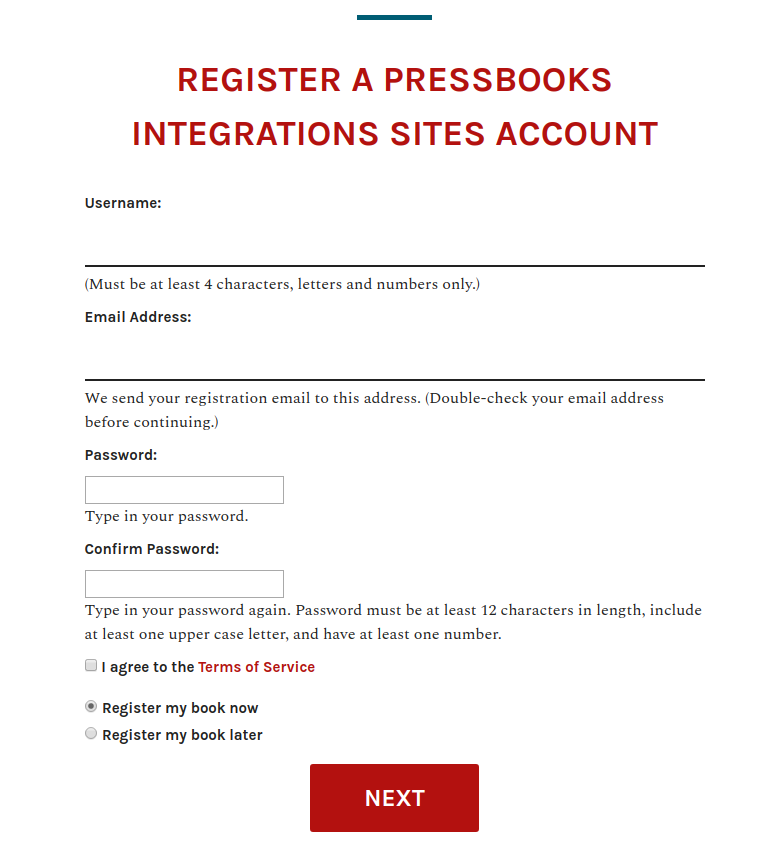
If visitors to your network click the Sign Up link, they’ll be taken to a user account registration page (shown below). In addition to account information, they are also asked whether they would like to create a new book at the time of registration or wait until later to do so.
Allow book administrators to invite new users as collaborators on their book
As a network manager, you can also decide whether or not book administrators have the power to invite collaborators to join them in their books. This box is unchecked by default, which means that book admins will not see the Users option in their book dashboard, and will be unable to invite new or existing users to join them in their books. In this scenario, network managers will be the only users who can add new users to existing books.
If you would like to enable book administrators to invite new or existing users to join them as collaborators in their books, you can do so by checking this box and clicking Save Changes. When this option is selected, book admins will be able to invite existing and existing users to their books and select those users’ roles within their book from the Users menu from their book dashboard. Any new collaborators that book admins add to their individual books will also become users on your network once their accounts are confirmed.
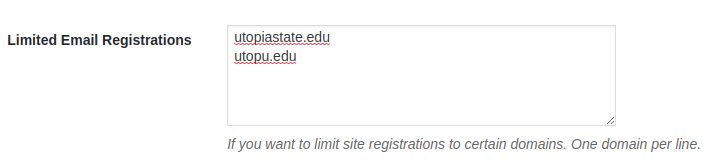
Limit Email Registrations
As a network manager, you can set limits on which users are permitted to register accounts on your network by specifying one or more permitted email domains for user accounts. For example, you may be running a Pressbooks network for Utopia State University, where all users are issued utopiastate.edu or utopu.edu email account. If you would like to restrict new user registrations to only people who have an email address from one of these domains, you could do so by 1) Entering each of the permitted domains on its own line and 2) Clicking Save Changes. Using the example provide above, you’d put utopiastate.edu on one line and utopu.edu on a second line, as shown in the screenshot below:
utopiastate.edu addresses only, you could not invite a user with any otherBan Email Domains
As a network manager, you can also ban users with certain email domains from registering for your network. This feature functions like the limited email registration option above, except that it prevents any users with emails from the specified domains from being registered on your network. This features is very rarely used by Pressbooks network managers, but may be helpful if you permit book admins to add collaborators to their books, but don’t want them to invite collaborators with emails issued by a specific provider or organization.
To ban email domains from being able to be registered on your site, enter each of the domains you wish to ban on its own line in the banned email domains field and click Save Changes.
Send Email Notifications
If desired, you can send email notifications to one or more email addresses each time a new book or user is registered on your Pressbooks network. To send these notifications:
- check the Send the network admin an email notification every time someone registers a site or user account box
- enter the email addresses you’d like to send these notifications to in the input field below, with one email per line
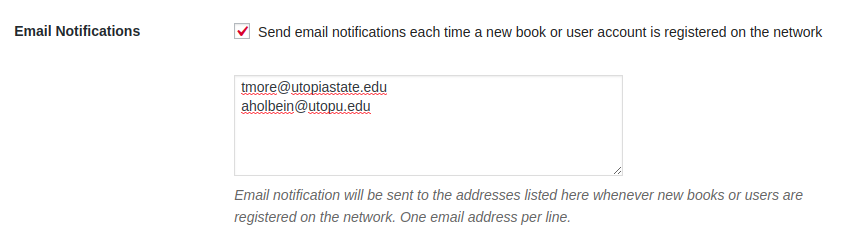
- Click ‘Save Changes‘
Require users to opt-in to terms of service at registration
When selected, the “Require users to opt-in to terms of service at registration” setting adds a check box requiring a user to accept your terms of service as part of their self-registration process. The “Terms of Service” setting lets you select which page on your root network will serve as your network’s terms of service. You must select ‘Require users to opt-in to terms of service at registration’ in order to select a terms of service page.
You can create a Terms of Service page at any time by following the instructions provided in the Add a Page chapter in this guide. Once you’ve created and published the page you’d like to serve as your Terms of Service at your network root, that page will appear as one of the in the dropdown menu choices for this setting.
To set a terms of service page:
- Create & publish a terms of service page
- Select the title of the desired page from the dropdown menu in this setting
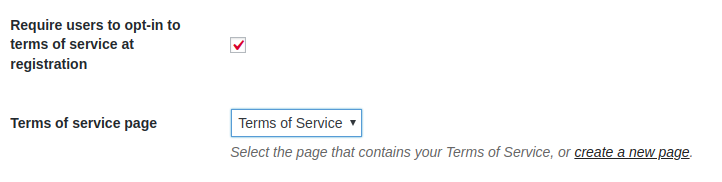
- Click Save Changes

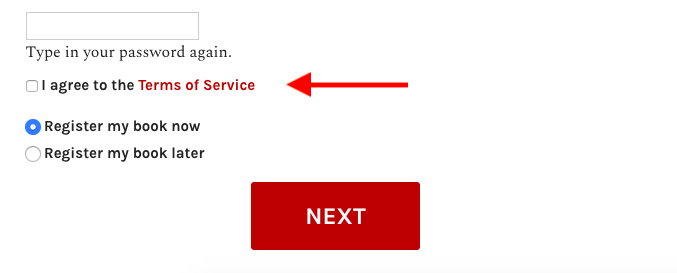
If you’ve checked this box and linked to a Terms of Service page, a terms of service ‘opt-in’ checkbox will be added to the default registration form, and must be selected before users can finish registering for their account. Users who attempt to register for new accounts will see a checkbox that states “I agree to the Terms of Service” on the registration page. This words ‘Terms of Service’ will link to your Terms of Service page.
Customize Welcome Email and Welcome User Email Messages
These field contains the text of welcome emails sent to newly registered users under very specific conditions.
The Welcome Email message is only sent when all of the following are true: 1) your network permits self-registration, 2) a new user successfully self-registers and 3) as part of their registration, the new user elects to create a book at the time of registration and 4) that user successfully activates their newly created book by responding to the confirmation email.
The Welcome User Email message is only sent when all of the following are true: 1) your network permits self-registration, 2) a new user successfully self-registers, 3) the new user chooses not to create a book at the time of registration, and 4) that that user successfully activates their account by responding to a confirmation email.
You may notice that some parts of these default messages are written in ALL CAPS. These strings are special variables that will be replaced in the actual email with contextually relevant text (i.e. USERNAME will be replaced by the actual username value of the recipient).
You can personalize either or both of these message, if desired. After making modifications, click the Save Changes button at the bottom of the page.
Send Events to Google Analytics
As a network manager, you’re able to send visitor traffic information to a Google Analytics dashboard if you so desire.
Note: All Pressbooks networks now include a native integration with Koko Analytics, which many users may prefer, since it requires no additional configuration, does not use any external services, and respects your visitors’ privacy.
If you would like to configure your Pressbooks network to send page view information to Google Analytics:
- Use the Google Analytics dashboard and create a new web ‘property’ for your Pressbooks network (i.e. the URL of your network itself). Doing so will give you a Google Analytics ID for that property. (Please note that if your network currently uses a Universal Analytics property, going to the Admin view for it in the Google Analytics dashboard will lead you to a ‘GA4 Setup Assistant’; you will be able to set up a connected Google Analytics 4 property there, copy its ID (for example ‘G-A123B4C5DE6’), and enter it on this page.)
- Once this has been generated, paste this value in the relevant Google Analytics ID field.

- Click Save Changes.
Once your Google Analytics ID has been saved here, your Pressbooks network will begin sending information about web traffic and book download events to your Google Analytics dashboard.
By default, all analytics data will be sent to the “All Web Site Data” view, and include data for all frontend and backend (admin) pages. This means the data for all the books on your network will be collected in the same place. In some cases, network managers may want to give individual book authors direct access to the analytics data. This can be done in different ways, such as through filtered views or custom reports. Please refer to Google Analytics’ documentation for instructions on configuring and using this optional third-party integration.
