Configure Pressbooks Results
Pressbooks provides an optional add-on for Pressbooks networks called ‘Pressbooks Results.’ This product is an LTI 1.3 provider plugin which allows you to connect your Pressbooks network to one or more Learning Management Systems via a secure LTI 1.3 connection and send results from learner activity from Pressbooks to the LMS gradebook.
This guide chapter will explain how you can configure Pressbooks Results with several different Learning Management Systems. Navigate to your LMS-specific instructions:
Canvas
Begin by reading Canvas’ documentation for configuring an LTI 1.3/Advantage tool. Once you are familiar with the basic steps described there, follow the steps below.
In Canvas
- Log into your Canvas account as an administrator and visit Admin > Site Admin > Developer Keys > + Developer Key > + LTI Key.
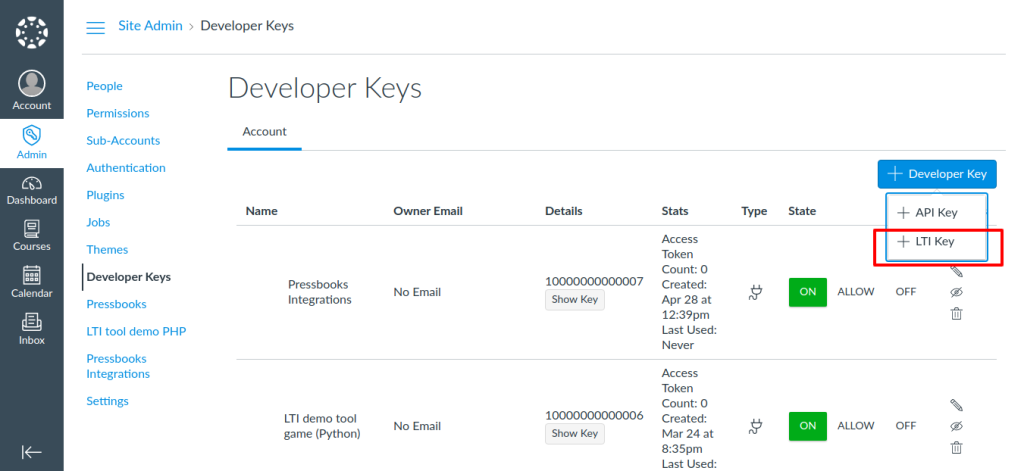
LTI Developer Keys menu in Canvas You will see a menu with several required fields (screenshot below):
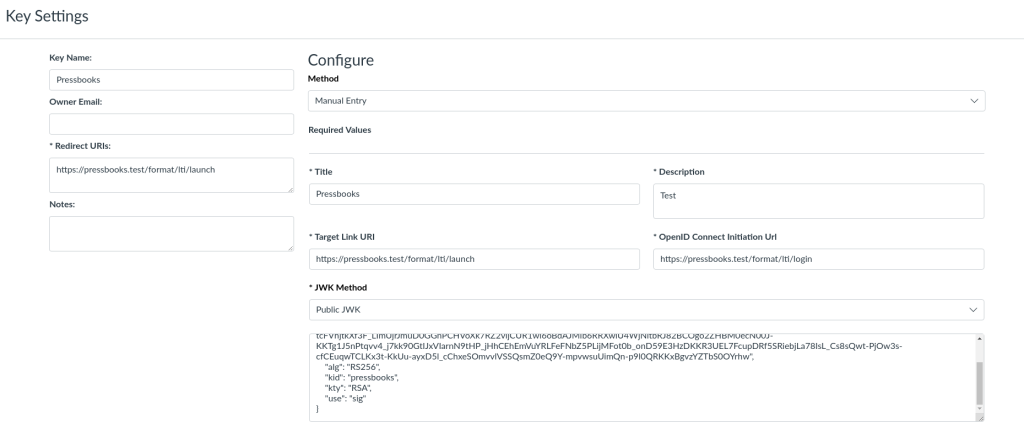
LTI Key Configuration Menu in Canvas - Enter the following values into the required fields, replacing [PRESSBOOKS DOMAIN] with the root URL of your Pressbooks network (i.e. university.pressbooks.pub):
- Redirect URIs: https://[PRESSBOOKS DOMAIN]/format/lti/launch
- Target Link URI: https://[PRESSBOOKS DOMAIN]/format/lti/launch
- OpenID Connect Initiation Url: https://[PRESSBOOKS DOMAIN]/format/lti/login
- JWK Method: Select ‘Public JWK’. Open a new tab in your browser and go to: https://[PRESSBOOKS DOMAIN]/format/lti/public_jwk. This page will display a value that looks something like:
{"keys":[{"kty":"RSA","alg":"RS256","use":"sig","e":"AQAB","n":"sR53yGj4JjY6BLpUACKiP36m2ejHrAJiBNnndskdkUkmAZBL7LAzqW_kEBh3P2yjyssHFlLfmMGwIAgAqHGIcVjRdJ_gRn28ZgnLynVdvzhFPanxxp2vfmWt7t08tenH-72ovlRQxOSNrDw4Y878142mE5UclG8hl_oubIc1gsSbLO548BkT0VVG--yWaKy8YG3b0XKzAphaOZEIk02Hdn13hPCStS4LM5Pv5lhIgOOZ89B-ZYM2zvhLBBBGBsHKyIn6GD_kSrEsiXUFsi8YPhfkKqa9YC5ifVr97Q5PLcVrUZ16XgLyD0joJXEv6ceCRY1uJh4U4QZZY4lo8vcHhw","kid":"pressbooks"}]}Enter the value inside the square brackets on your network’s public_jwk page into Canvas’ “Public JWK” field. In the example above, the expected value would be only the part that has been bolded. Do not use the actual value above (it’s only an example) when configuring your network in Canvas; use the relevant part of the value that appears on your network’s/format/lti/public_jwkpage. - LTI Advantage Services: Enable all desired toggles. If you intend to use Pressbooks to create graded assignments, we recommend that you select at least ‘Can create and view assignment data in the gradebook associated with the tool.’; ‘Can view assignment data in the gradebook associated with the tool.’; ‘Can view submission data for assignments associated with the tool.’; ‘Can create and update submission results for assignments associated with the tool.’; ‘Can retrieve user data associated with the context the tool is installed in.’ and ‘Can update public jwk for LTI services.’
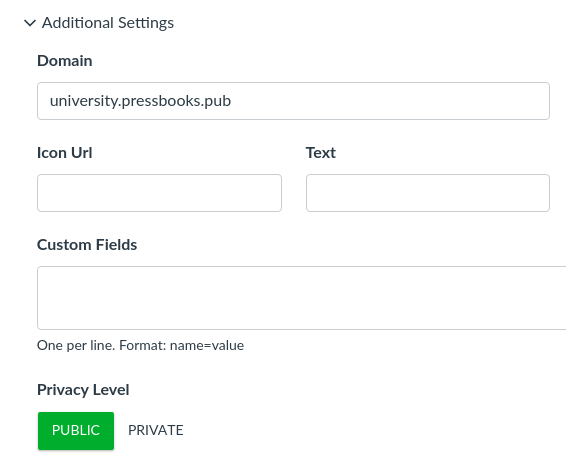
- Additional Settings: Enter your [PRESSBOOKS DOMAIN] as the Domain value, making sure that the value for this particular field has no https:// in it. The value here should just be the domain itself; for example, university.pressbooks.pub. Then, change the ‘Privacy Level’ to “Public”. This will allow Pressbooks to receive username and email values from the LMS, which avoids the creation of duplicate accounts for existing users and makes sure that users created via LTI can be identified within the Pressbooks platform.
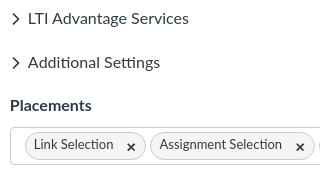
- Placements: There are no required placements for the Pressbooks LTI 1.3 plugin. If you’d like to allow instructors to manually create LTI links or graded assignments for individual chapters, rather than using the Common Cartridge import method, you should add ‘Link Selection’ and ‘Assignment Selection’ as placement options.
- Make sure the state of the tool is set to ON. Store the client ID value visible in the Details column of your new key for the next step.
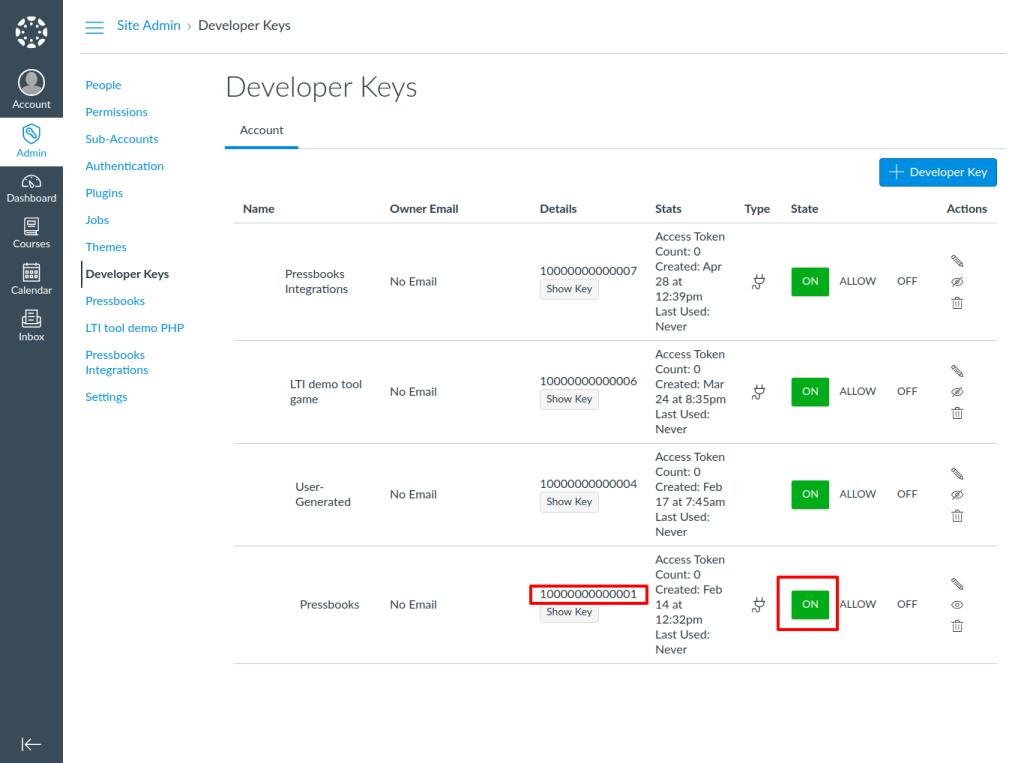
The Client ID value for an LTI 1.3 application (visible in Canvas under the ‘Details’ Column) - In Canvas, go to the account, subaccount, and/or course that you’d like Pressbooks to be available in as an LTI 1.3 app.
- Click Settings > Apps > + App.
- Choose By Client ID as configuration type and enter the Client ID of the Developer Key (from the previous step).
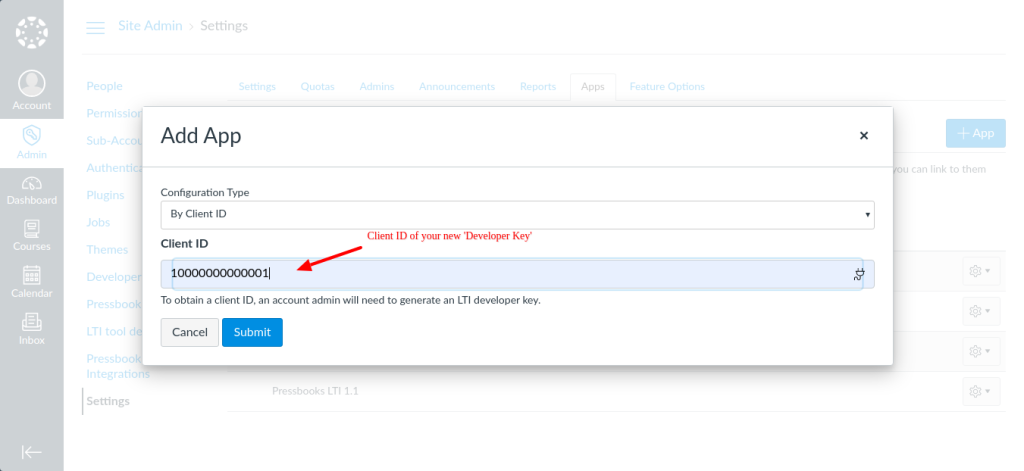
The location you should enter the Client ID of your LTI tool is shown above - Store and save your deployment ID(s) for the next step.
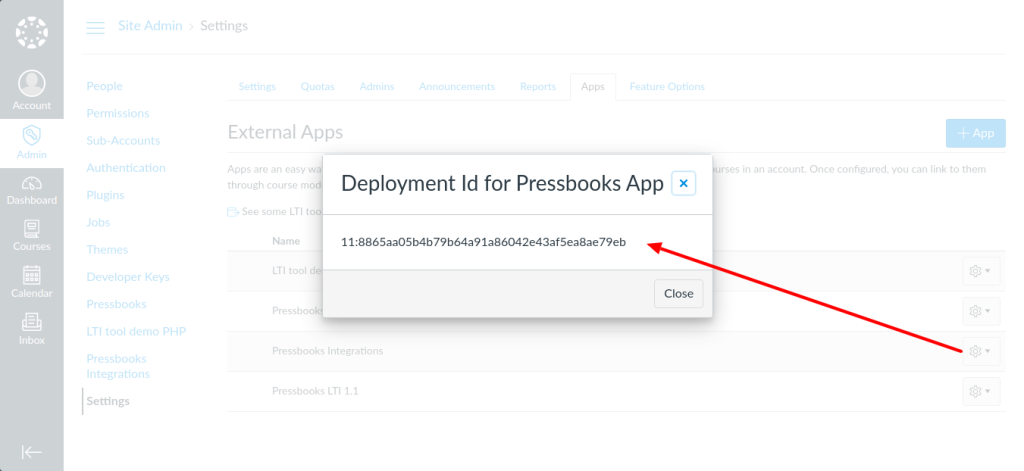
Sample Deployment ID for an LTI 1.3 app configured in Canvas

In Pressbooks
- In Pressbooks, go to Network Admin > Integrations > LTI Consumers > Add new. Network managers can access this page directly at https://[PRESSBOOKS DOMAIN]/wp-admin/network/admin.php?page=pb_lti_consumers&action=new
- You will see a form with several expected field values:
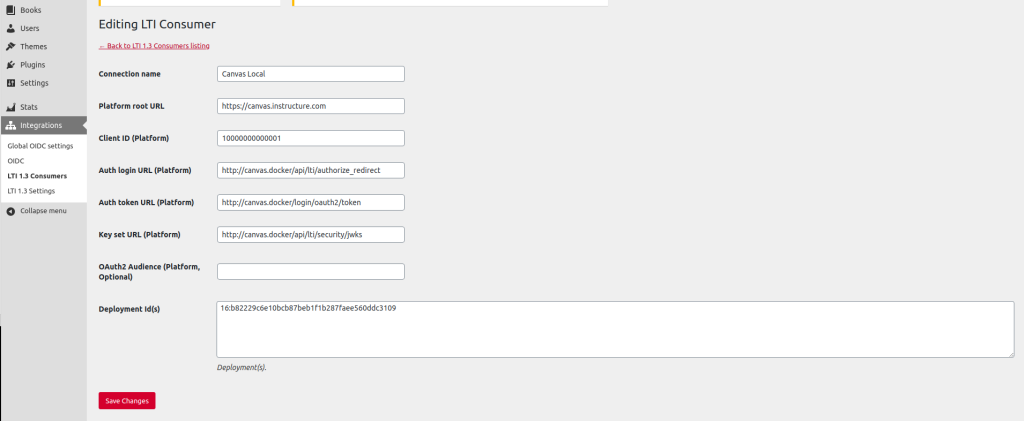
New LTI Consumer menu in Pressbooks Enter the following information in the form fields. Replace [CANVAS DOMAIN] with the URL of your Canvas instance [i.e. canvas.university.edu]:
- Platform root URL: https://canvas.instructure.com (This value will always be used as the platform root URL for production instances of Canvas, even if your institution hosts their Canvas instance at a domain that you control. The only exceptions are if you are configuring Pressbooks on a test or beta instance of Canvas, in which cases the platform root URL will be https://canvas.test.instructure.com or https://canvas.beta.instructure.com, respectively.)
- Client ID: Client ID from LTI 1.3 ‘Developer key’ from Canvas (see step 3 in the previous section)
- Auth login URL: https://[CANVAS DOMAIN]/api/lti/authorize_redirect
- Auth token URL: https://[CANVAS DOMAIN]/login/oauth2/token
- Key set URL: https://[CANVAS DOMAIN]/api/lti/security/jwks
- Deployment ID(s): Canvas application deployment ID or IDs (stored in step 4 of the previous section)
This video shows the LTI 1.3 registration process from beginning to end for Canvas:
Blackboard
In Blackboard
- In Blackboard, click System Admin > LTI Tool Providers > Register LTI 1.3 Tool. Enter the [Client ID] value provided by Pressbooks support staff and click ‘Submit’
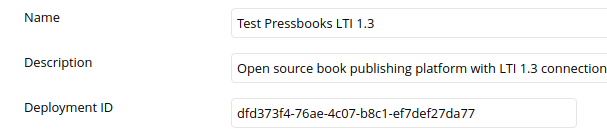
- Copy the ‘Deployment ID‘ value for the newly registered tool. You will need this value to complete tool registration in Pressbooks. A sample value is shown below (you should use the value created in your Blackboard instance).
- Make sure the following values are selected:
- Tool Status: Approved
- User Fields to Send: Check Role in Course, Name, Email Address.
- Allow grade service access: Yes
- Allow Membership Service Access: Yes
- Click ‘Submit‘
Please note that if you intend to use Pressbooks to create graded assignments, a further step is needed here: from the System Admin > LTI Tool Providers page, navigate to Manage Global Properties, ensure that ‘Allow configured tool providers to post grades’ is set to ‘Yes,’ and click ‘submit’
In Pressbooks
- In Pressbooks, go to: Network Admin > Integrations > LTI Consumers > Add new. Alternatively, network managers can access this page directly at https://[PRESSBOOKS DOMAIN]/wp-admin/network/admin.php?page=pb_lti_consumers&action=new
- Enter the following values:
- Platform root URL: https://blackboard.com
- Client ID: Client ID value provided by Pressbooks support staff
- Auth login URL: https://developer.blackboard.com/api/v1/gateway/oidcauth
- Auth token URL: https://developer.blackboard.com/api/v1/gateway/oauth2/jwttoken
- Key set URL: https://developer.blackboard.com/api/v1/management/applications/[CLIENT_ID]/jwks.json (replace CLIENT_ID with the Client ID value provided by Pressbooks support staff)
- Deployment ID(s): Deployment ID value from Blackboard tool registration (step 2 of previous section)
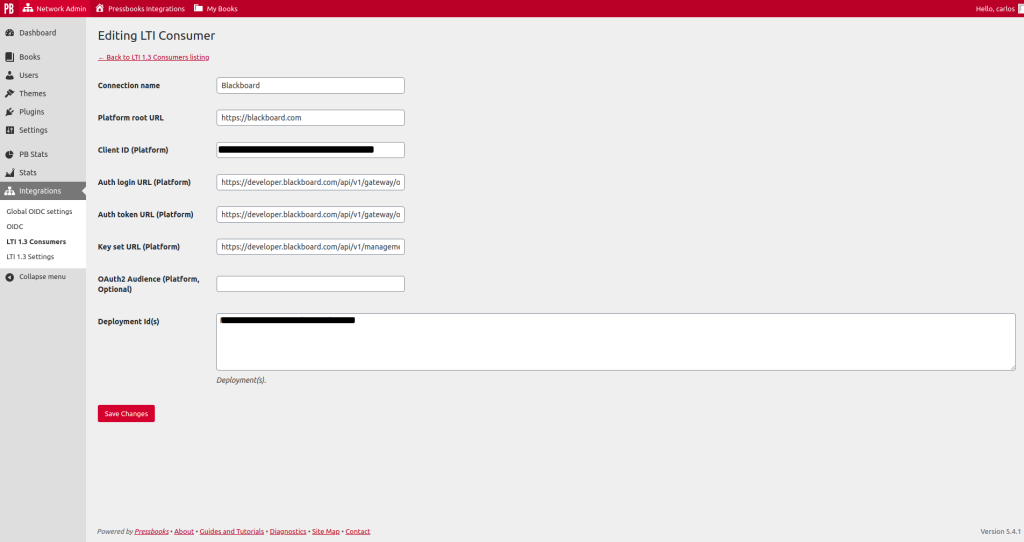 New LTI Consumer menu in Pressbooks
- Click ‘Save Changes‘

This video shows the LTI 1.3 registration process from beginning to end for Blackboard:
Moodle
In Moodle
- Log as an administrator and go to: Site Administration > Plugins > Manage tools > configure a tool manually
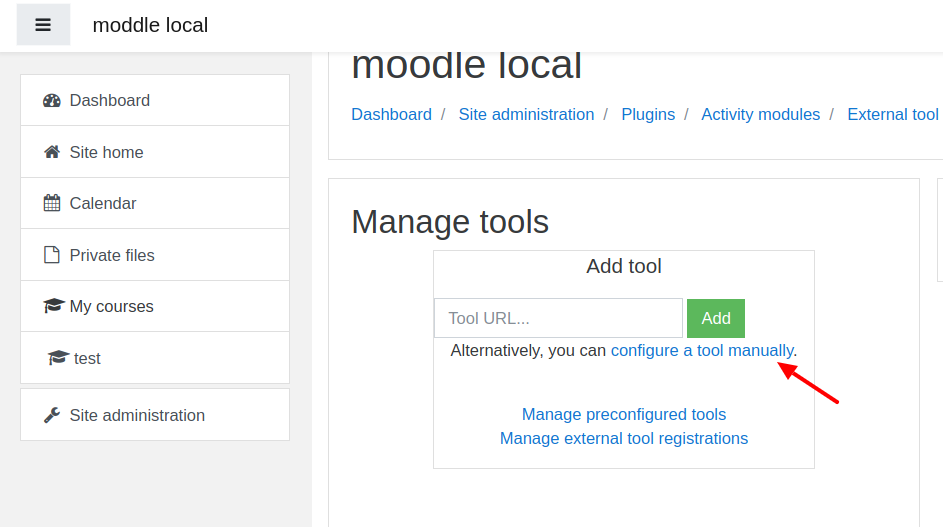
Where to find the ‘configure a tool manually’ option in Moodle - You will see a form with several requested fields.
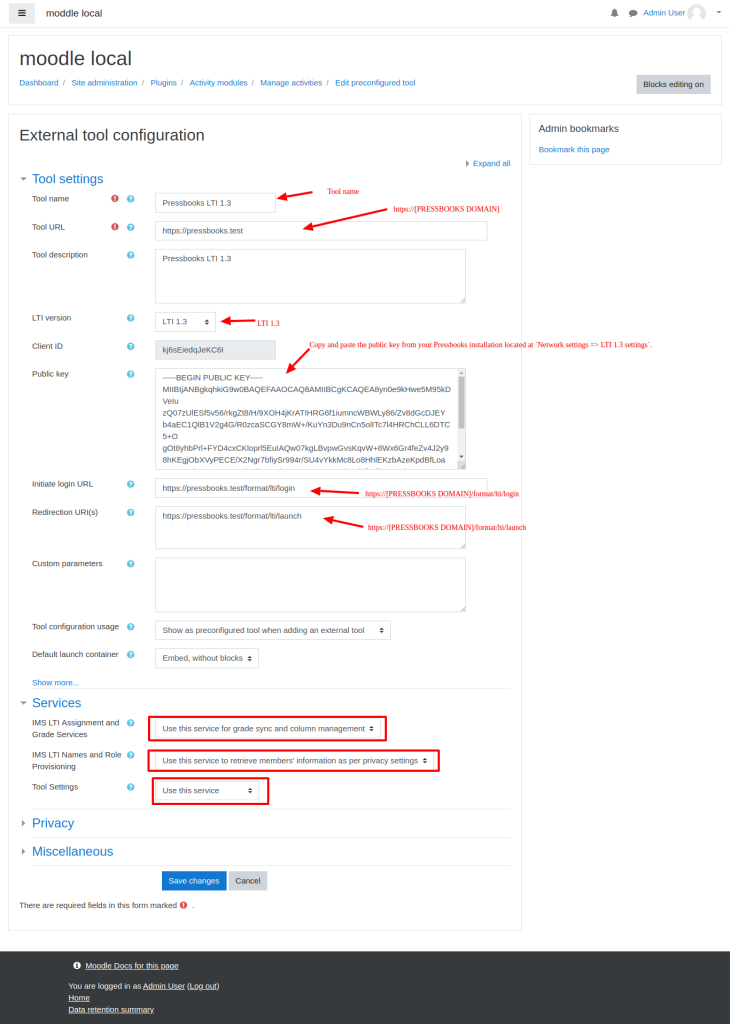
Moodle LTI 1.3 tool configuration menu Fill the form out with the following values, replacing PRESSBOOKS DOMAIN with the root URL of your Pressbooks network (i.e. university.pressbooks.pub):
- Tool name: Pressbooks LTI 1.3 (or similar)
- Tool URL: https://[PRESSBOOKS DOMAIN]
- LTI version: LTI 1.3
- Public key: Copy and paste the public key from your Pressbooks installation located at Network Settings > LTI 1.3 settings or directly visible to network managers at https://[PRESSBOOKS DOMAIN]/wp-admin/network/admin.php?page=pb_lti_settings
- Initiate login URL: https://[PRESSBOOKS DOMAIN]/format/lti/login
- Redirection URI(s): https://[PRESSBOOKS DOMAIN]/format/lti/launch
- Services:
- IMS LTI Assignment and Grade Services: Use this service for grade sync and column management
- IMS LTI Names and Role Provisioning: Use this service to retrieve members’ information as per privacy settings
- Tool Settings: Use this service
- Save changes
- Retrieve the tool connector information from your newly configured LTI 1.3 application in Moodle:
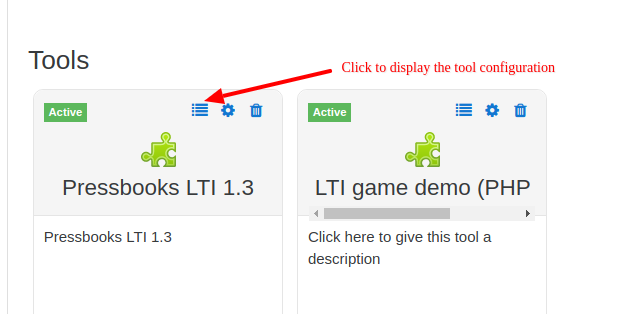
Where to find the LTI tool configuration menu in Moodle You will then see a set of values that you will use to configure the tool in Pressbooks:
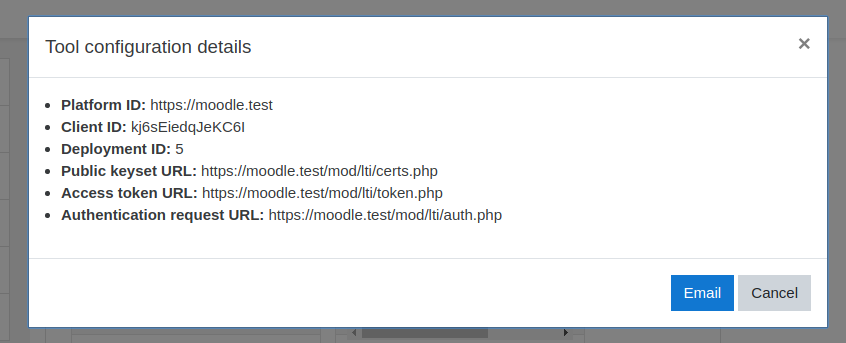
Sample LTI tool configuration details in Moodle - [Only for Moodle versions prior to 3.9.0] Add client_id parameter to the login URL:
- Edit the the tool configuration:
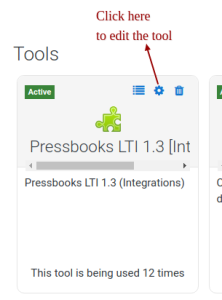
Sample editing LTI tool created - Add ?client_id=<YOUR_CLIENT_ID> at the end of the Login URL:
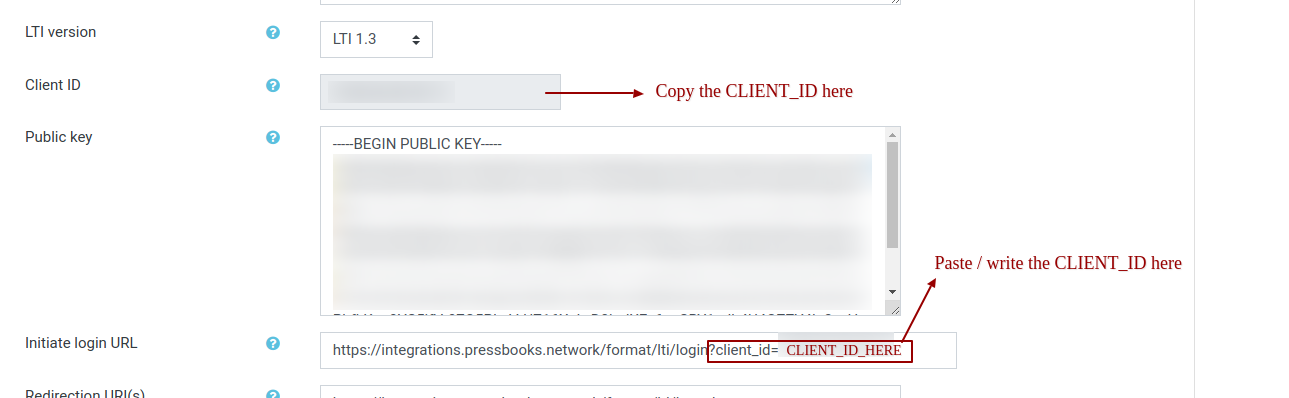
Add the client_id query parameter at the end of the Login URL
- Edit the the tool configuration:
In Pressbooks
- In Pressbooks, log as a network manager and go to: Network Admin > Integrations > LTI Consumers > Add new. Network managers can access this page directly at https://[PRESSBOOKS DOMAIN]/wp-admin/network/admin.php?page=pb_lti_consumers&action=new
- You will see a new consumer form which requests several values to complete configuration. Enter the following values:
- Connection Name: Moodle LMS (or similar)
- Platform root URL: The Platform ID value provided by Moodle
- Client ID: The Client ID value provided by Moodle
- Auth login URL: The Authentication request URL value provided by Moodle
- Auth token URL: The Access token URL value provided by Moodle
- Key set URL: The Public keyset URL value provided by Moodle
- Deployment ID(s): The Deployment ID value provided by Moodle
This video shows the LTI 1.3 registration process from beginning to end for Moodle:
Desire2Learn/Brightspace
In Brightspace
Jordan Snider from D2L/Brightspace has provided the following 5 minute demo video showing how to configure an LTI 1.3 tool in Brightspace:
In the Register a Tool section on your Brightspace: these values are specific to the the institution (at 1:02 in the video). Therefore, the framework for the values you see on the video must be replicated, but using the your Pressbooks network URL (as in, your institutional URL would replace ‘integrations.pressbooks.network’ that you see in the demo video above).
That being said, these are the values you would input:
Domain: https://[PRESSBOOKS DOMAIN]
Redirect URIs: https://[PRESSBOOKS DOMAIN]/format/lti/launch
OpenID Connect URL: https://[PRESSBOOKS DOMAIN]/format/lti/login
Keyset URL: https://[PRESSBOOKS DOMAIN]/format/lti/public_jwk
In Pressbooks
Now, you will complete the configuration on Pressbooks.
- In Pressbooks, go to: Network Admin > Integrations > LTI Consumers > Add new. Alternatively, network managers can access this page directly at https://[PRESSBOOKS DOMAIN]/wp-admin/network/admin.php?page=pb_lti_consumers&action=new
- Enter the following values:
- Platform root URL: https://[institution’s D2L URL]
- Client ID: Client ID value provided by Brightspace (example as seen at 1:57 in the video above)
- Auth login URL: https://[institution’s D2L URL]/d2l/lti/authenticate
- Auth token URL: https://auth.brightspace.com/core/connect/token
- Key set URL: https://[institution’s D2L URL]/d2l/.well-known/jwks
- Deployment ID(s): Deployment ID value from D2L tool registration (example as seen at the end of the video above)
Once you’ve configured these values on both D2L and Pressbooks, you should be ready to try importing your content on to Pressbooks using the instructions in the next chapter.
